Dreamweaver can be used to publish your website with its built in file publishing utility. Note: This tutorial assumes you have already resolved your domain name and are able to see the welcome page or are switching from another HTML editor like the old Microsoft Frontpage (no longer supported).
To setup Dreamweaver, go into your site definitions. On the latest MX release that is "site" tab at the top of the screen. Click on the site tab, then click the "edit sites" (ex. 1) option, and select the site you are trying to publish.

Now click the "edit" button and the local properties (ex. 2) appear. Fill out the form identical to what you see here, but of course replacing yoursite.com with your actual domain name, and the file paths to wherever you have your site located on your local machine.


Now that you have told Dreamweaver where to get the files from on your local computer, you can now tell it where to put them on the web server. Using the same dialogue box, select "remote info" (ex. 3) from the list, then fill out the form same as above, replacing the necessary text with your own information.

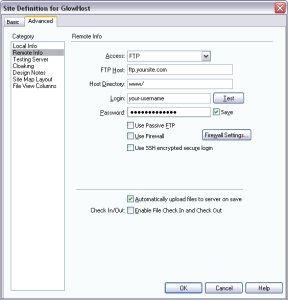
Notice that you are selecting FTP from the list of available methods used for publishing.
The FTP host is the ftp host found in your welcome/instruction email.
The Host directory is public_html. In this example I used "www" because this works also. "www" is a shortcut to public_html. If you use "www" and it does not work, use public_html instead. Type in your ftp (also the same as cPanel) username and password into the appropriate boxes. I used the option to automatically upload files to the server on save. What this does is put a file on the web as soon as you use the "save" or "save as" options in Dreamweaver.
Use Passive FTP: checked or unchecked. We recommend checked (though in the screen shot notice it is not checked) If you have difficulty retaining your ftp connection, or the connection constantly times out halfway through the process, or disconnects for any other reason mid way through the process, or you get "waiting for server" errors, try toggling this mode to see what works best for you. Passive mode enabled is the solution to most time out errors.
Auto-upload files on save: checked or unchecked. This can be good and bad. If you are developing your homepage or an active page and need to save it for later, but do not want the world to see a partially completed page, you may want to keep this option unchecked for now, until you are comfortable using it.
After you have filled this out, use the "test connection" link. If it says that it was successful, you are good to go and can now publish using Dreamweaver. If it fails to connect, most likely your username and/or password are incorrect. To fix this, make sure you are able to login to your cPanel with the same user and password you put in this dialogue and it should work.
If you have difficulty putting your entire site, or large portions of it using Dreamweaver, you can try using the checkbox to use passive FTP which can be a "cure-all" for some users who encounter incessant Dreamweaver errors about the "server not responding" or similar issues/errors.
...
| Content by Label | ||||||||||||||||||||
|---|---|---|---|---|---|---|---|---|---|---|---|---|---|---|---|---|---|---|---|---|
|